Uncategorised
FELT BASKETS FOR THE POOR
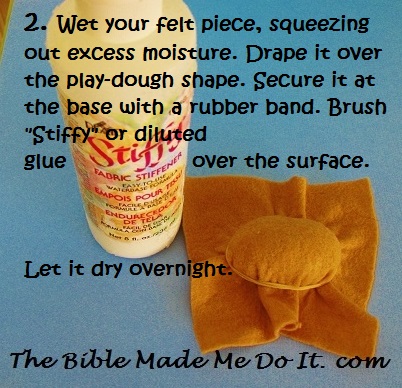
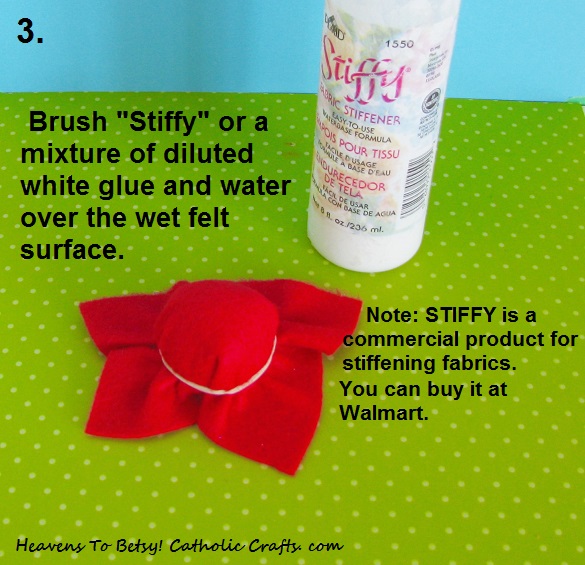
Learn a new and fun easy craft! Form felt baskets by shaping damp felt over a play-dough mould. Spread on a mixture of glue and water, let dry and—presto—-a basket! Follow the photo directions below for instructions.

Mother Teresa used to bring baskets of food for the poor. You can make your own miniature felt baskets. They are so easy and fun to make. You can also make tiny breads from salt dough to fill them with. If you make the baskets in Easter colours—they make ideal tiny Easter baskets!
This is a new craft for children to learn: Just follow the photo directions! If you don’t have STIFFY (a commercial fabric stiffener) you can use a diluted mixture of white glue and water. Just add a handle and you have a basket for breads.
When you remove your dry “basket” from the mould, just turn it upside down and there is your basket! You just have to cut off the excess edges. And add a felt handle as in the photograph.
TO MAKE THE BREADS:
Follow the salt dough recipe. Use bottle caps to cut out the tiny breads and bake according to the directions. Sprinkle on a bit of flour before you bake them to add an authentic look.
SALT DOUGH RECIPE
1 cup salt
2 cups flour
1 cup water
Gradually stir in water. Mix well and knead the mixture until smooth. Bake in oven at 250 degrees for 2 hours. Store in the fridge. It is best if used within a few days.


BLESSED GIORGIO FRASSATI: SKIER
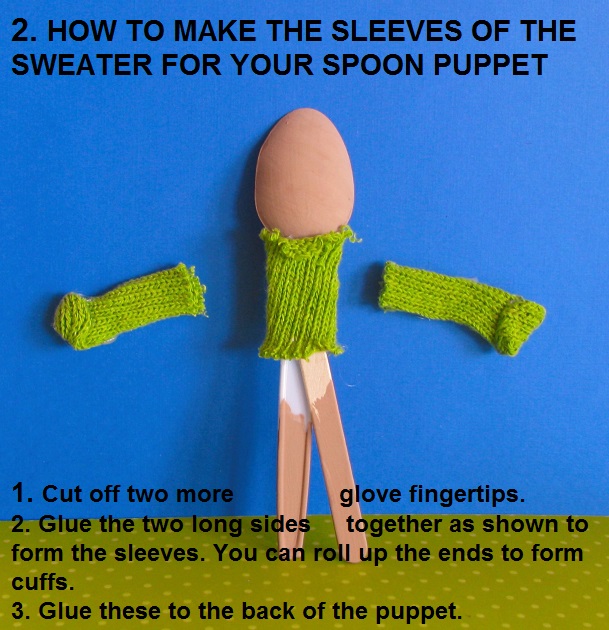
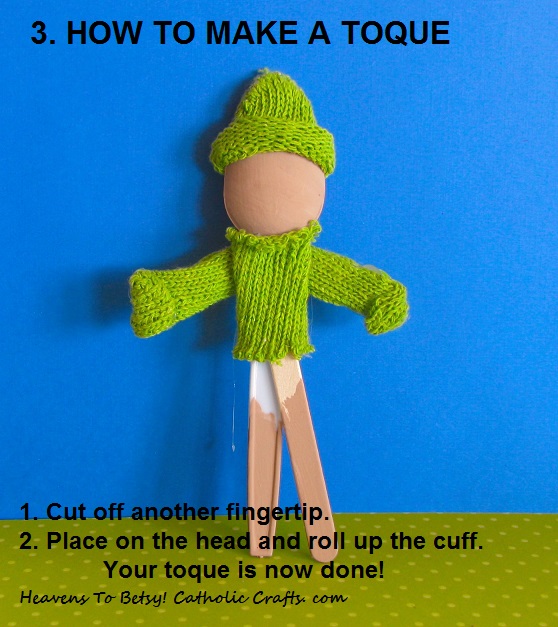
Blessed Giorgio was an avid skier! His skiis are made from popsicle sticks and his sweater and toque couldn’t be easier—they are made from the finger-tips of a glove! Just cut out one finger-tip, fit it over the head and presto—a toque! Another finger-tip fits over the spoon and becomes the body of the sweater.

To make Blessed Giorgio, follow the basic photo directions of how to make a spoon doll.
1. Paint the legs the desired colour. These will be the ski pants!
2. To make the body of the sweater, cut off a finger-tip from the glove. Cut off the top part of the finger-tip as well. Slide this over the “body” of the doll (the handle of the spoon). Roll down a cuff. Glue the sweater to the spoon handle.
3. To make the sweater sleeves: cut off two finger-tips. Roll them up the long way and glue the long edges together as shown in the photo.
4. Glue the sleeves to the back of the doll.
5. The toque is super-easy! Cut off a finger-tip and fit it over the head. A cuff will form on the toque. Glue on a pompom.
6. The scarf is made form a strip of felt with fringed edges.
NOTE: To make the second leg glue on a popsicle stick to the spoon handle as shown in the photograph below.
TO MAKE THE SKIIS AND POLES:
1. Paint the popsicle stick “skiis.”
2. The ski poles are wooden skewers (from the Dollar Store) pierced with small felt circles.
3. To make the ski boots: cut out 2 tiny rectangles. Round the ends. Fold down a small part from the end and glue this piece flat to the skis as shown in the photo.

ST. GIANNA MOLLA, DOCTOR (spoon puppet)
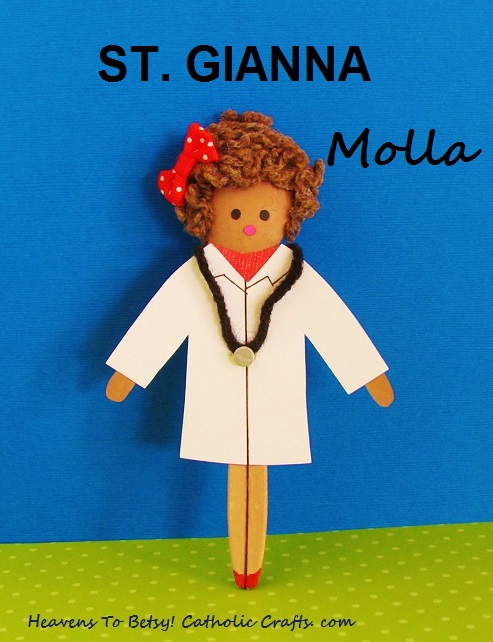
Make a quick and easy spoon puppet of St. Gianna. Just glue on her doctor’s lab coat (to a plastic spoon) and make a stethoscope. Directions for her curly hair are included in the photo directions. Don’t you love her red shoes?
SPOON PUPPET:
1. Paint the head and legs of the spoon in a skin colour.
2. Print out the coat and cut out.
3. Glue the coat (the pattern is below) to the head of the figure, slightly above “chin level” so that the face will be in proportion to the rest of the figure. Paint the part under the coat (the blouse) before you glue on the coat.
4. Add facial features and yarn hair. Her hair could also be painted on.
TO MAKE HER CURLY HAIR:
Wind yarn many times around a pencil. Soak it for a few minutes, let dry and remove the yarn from the pencil. Result: curly hair to glue on your figure! Press the curls tightly together and glue to the head.
TO MAKE THE STETHOSCOPE:
Take a length of black yarn and brush over it a diluted mixture of white glue and water. While still damp, form it into the shape you see in the above photograph. Let dry. Glue the ends to the back of the figure. Glue a small silver circle to the stethoscope.

ST. GIANNA MOLLA, skater
St. Gianna Molla (1922-1962) who was born in Italy was a doctor as well as a devoted wife and mother. She was also a devout Catholic who was active in helping the poor and working for CATHOLIC ACTION in Italy. She gave up her own life to save the life of her unborn child. She was canonized a saint by Pope St. John Paul ll in 2004. And—
St. Gianna enjoyed all kinds of winter sports! Especially skating! This figure of St. Gianna Molla as a skater is very easy to make. It is made from a plastic spoon and an old glove!
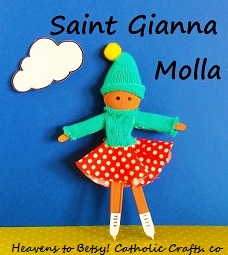
Follow the photo directions to make St. Gianna. Her two legs are formed from a second popsicle stick glued on to the spoon. Her sweater is made from the fingertips of a glove! Her whirly skating skirt is made from a circle. Add silver-painted triangles to form the points of her skates. The skates are painted on to the figure. You can add tiny felt hands (glued into the inside of the sleeves).
Cut the circle to make the skirt as short or as long as you want. Follow the photo directions to make her outfit.

To make her skating skirt follow the directions below: Note that you omit the directions for the popsicle stick arms because St. Gianna’s arms are made with the rolled together finger-tips of a glove.j


ST. JOHN 23RD IN HIS RED SATURNO HAT
Make this figure of Pope St. John 23rd from a toilet paper roll! His hat can be made in two ways: one, from a plastic Easter egg (VERY VERY EASY) or from the directions below (on how to make a felt hat—it is very easy too but requires a little more preparation—but very fun to do!)
His nose is a tiny pebble (or a tiny dried pea). And how do you like his signature red shoes?
 T
T
HOW TO MAKE THE FIGURE OF POPE ST. JOHN 23rd
1. Paint the toilet paper roll using the photo as a guide.
2. To make the cape: Cut out a strip of felt 6″ (15cm) x 1.5″(4cm). Round off the front edges. Glue to the roll. Add a nose (a dried pea!) and eyes. His shoes are red felt ovals.
MAKING A SATURNO HAT: (USE THE PHOTO INSTRUCTIONS BELOW)
1. Begin with a felt circle 4″ (10cm).
2. To make the donut shape: place the toilet paper roll in the centre of the circle. Trace around it to make the smaller inside circle. Cut just inside this outline so that the hole is smaller than the actual traced outline. You want a tight fit when the donut shape (the brim of the hat) is placed over the felt-covered mould (which will be the crown of the hat).
3. Follow the photo directions to complete the hat.
NOTE: make the play-dough mould the size you want your finished hat (the crown part) to be.
HOW TO MAKE A SATURNO HAT FROM AN EASTER EGG:
The Saturno hat is made in the same way as a sombrero but it uses the rounded part of the plastic Easter egg instead of the more pointed end.

TO MAKE A SATURNO HAT FROM FELT:


EDWINA, SPOON DOLL
Edwina is one of the characters in the play about St. Marianne Cope. She is one of the leprosy patients in the play. She is VERY EASY to make. A plastic spoon forms her body and head and two popsicle sticks form her arms. Her dress is made from a circle of fabric.

Follow the photo directions for making Edwina:

SPOON DOLL:
This is a quick and easy doll to make—the skirt is a circle, folded in quarters. The bodice is a strip of fabric which is glued onto the doll.
1. Paint the face portion of the plastic spoon.
2. To form the arms, glue 2 popsicle sticks (or mini-craft sticks) to the back of the figure. If they are too long, a piece can be broken off and the broken edges can be wrapped with tape for safety.NOTE: IF YOU ARE MAKING A BODICE FOR THE DRESS, MAKE THIS FIRST—THEN ADD THE ARMS AFTER THIS STEP.
3. Paint the arms the same colour as the face.
TO FORM THE SKIRT OF THE DRESS:
1. Cut a circle of fabric (or paper) approx. 8″(20cm) in diameter. Fold the circle in half, then in half again.
2. At the centre-point make a tiny snip through all layers of the fabric, just large enough to slip over the spoon handle.
4. Form small pleats at the neck edge. Form one or two large pleats in the skirt.
5, Glue the skirt a little above the chin level of the doll.
TO FORM THE BODICE OF THE DRESS:
1. Cut a small strip of fabric (or paper) to wrap around the “chest” of the spoon.. Glue the centre section to the front of the figure (covering the top part of the skirt), overlapping the ends at the back. Glue in place.
To finish the doll add yarn hair and facial features.
SPOON PUPPET FIGURE: Adele
Adele is one of the characters in the play about St. Marianne Cope AN ANGEL IN OUR MIDST. She is one of the young leprosy patients in the care of St. Marianne Cope. Don’t you love her bright yellow dress?

SPOON DOLL:
This is a quick and easy doll to make—the skirt is a circle, folded in quarters. The bodice is a strip of fabric which is glued onto the doll.
1. Paint the face portion of the plastic spoon.
2. To form the arms, glue 2 popsicle sticks (or mini-craft sticks) to the back of the figure. If they are too long, a piece can be broken off and the broken edges can be wrapped with tape for safety.
3. Paint the arms the same colour as the face.
THE BODICE IS MADE BEFORE GLUING ON THE ARMS!
TO FORM THE SKIRT OF THE DRESS: (FOLLOW THE PHOTO DIRECTIONS BELOW)
1. Cut a circle of fabric (or paper) approx. 8″(20cm) in diameter. Fold the circle in half, then in half again.
2. At the centre-point make a tiny snip through all layers of the fabric, just large enough to slip over the spoon handle.
4. Form small pleats at the neck edge. Form one or two large pleats in the skirt.
5, Glue the skirt a little above the chin level of the doll.
TO FORM THE BODICE OF THE DRESS:
1. Cut a small strip of fabric (or paper) to wrap around the “chest” of the spoon. Glue the centre section to the front of the figure (covering the top part of the skirt), overlapping the ends at the back. Glue in place.
To finish the doll add yarn hair and facial features.
SPOON PUPPET FIGURE: Mrs. Toguchi
Mrs. Toguchi is one of the characters in the play about St. Marianne Cope called ANGEL IN OUR MIDST. You might want to make this easy spoon puppet to tell the wonderful story of St. Marianne and her work with the girls afflicted with leprosy in Hawaii. The puppet’s arms are popsicle sticks and her dress is a circle! The photo directions show how easy it is to make this figure.

Mrs. Toguchi’s hat is fun to make! Just copy out the pattern and decorate to your heart’s content. A slit in the brim enables the hat to stay on the head.
This is a quick and easy doll to make—the skirt is a circle, folded in quarters. The bodice is a strip of fabric which is glued onto the doll.
1. Paint the face portion of the plastic spoon.
2. To form the arms, glue 2 popsicle sticks (or mini-craft sticks) to the back of the figure. If they are too long, a piece can be broken off and the broken edges can be wrapped with tape for safety.
3. Paint the arms the same colour as the face.
THE BODICE MUST BE MADE BEFORE THE ARMS ARE GLUED ON.
TO FORM THE SKIRT OF THE DRESS: (FOLLOW THE PHOTO DIRECTIONS BELOW)
1. Cut a circle of fabric (or paper) approx. 8″(20cm) in diameter. Fold the circle in half, then in half again.
2. At the centre-point make a tiny snip through all layers of the fabric, just large enough to slip over the spoon handle.
4. Form small pleats at the neck edge. Form one or two large pleats in the skirt.
5, Glue the skirt a little above the chin level of the doll.
TO FORM THE BODICE OF THE DRESS:
Cut a small strip of fabric (or paper) to wrap around the “chest” of the spoon.. Glue the centre section to the front of the figure (covering the top part of the skirt), overlapping the ends at the back. Glue in place.
To finish the doll add yarn hair and facial features.
TO MAKE HER CURLY HAIR:
An easy way to make curly hair is the one you may have learned in school: Wind yarn around a pencil several times, soak in water briefly and let dry. This may take overnight. Remove yarn and you have a pile of curly hair! You can also paint on the hair to make it really easy!
k

ST. DAMIEN, DIORAMA

DAMIEN: DIORAMA
The figure of Father Damien is made from an ice-cream spoon. A toothpick taped to his back (and extending below the hem of his robe) enables him to be inserted into the setting. He can also be moved around in different positions. The diorama is made from a foam meat tray.
TO MAKE THE BASE:
1. Paint an upturned meat tray green.
2. Smear the surface with glue. Sprinkle on cut “grass.”
TO MAKE FATHER DAMIEN:
1. Print out the pattern for his robe, hat and beard. Colour and cut out.
2. Paint the ice-cream stick “face.” Glue on a beard. You can also leave the face unpainted. Add felt pen facial features.
3. Glue the robe to the body.
4. Cut out a slit in the hat and insert the hat through this slot to fit over the head. Use the photo as a guide.
5. Tape a toothpick to the back of the figure of Father Damien.
TO MAKE THE PALM TREE:
1. Print out, colour and cut out the palm tree.
2. Tape a toothpick to the back of the tree, extending below its base.
3. The palm tree can now be inserted into the foam base to complete the scene.

OUR LADY OF GUADALUPE WITH A DOUBLE HALO

THIS IS A PEANUT-CONE FIGURE OF OUR LADY OF GUADALUPE:
She has a double-halo and is very easy to make!


TO COMPLETE THE FIGURE:
- Follow the above directions as shown in the photographs. Add yarn hair and felt-pen facial features.
- Print out the patterns for the halo, colour and cut out. Glue the yellow inner halo to the outer green halo. Add “jewels.”
- Glue the halo to the back of the figure.
- To make the veil, cut out a strip of felt 9″(22cm) x .75″(2cm). Glue to the head of the figure as shown in the main photograph.